using printer software with Mac OS 8.6, 9.x, and X Classic
The printer is controlled by software installed on your computer. Use the printer software to perform the following
tasks:
●
choosing the printer
●
printing from the computer's desktop
●
checking the printer status
●
using the page setup dialog box
●
using the print dialog box
●
viewing and changing the status of a print job
Mac OS X Classic is a Mac OS X feature that allows applications built for Mac OS 9.x to run on a Mac OS X
computer. Mac OS X Classic applications have a Mac OS 9.x interface.
choosing the printer
Setting the printer as your computer's default printer automatically routes all print jobs to that printer.
You can select another printer for a particular document; however, switching printers may affect a document's
formatting and pagination. If you select a printer, always check the document for changes in formatting and
pagination before printing.
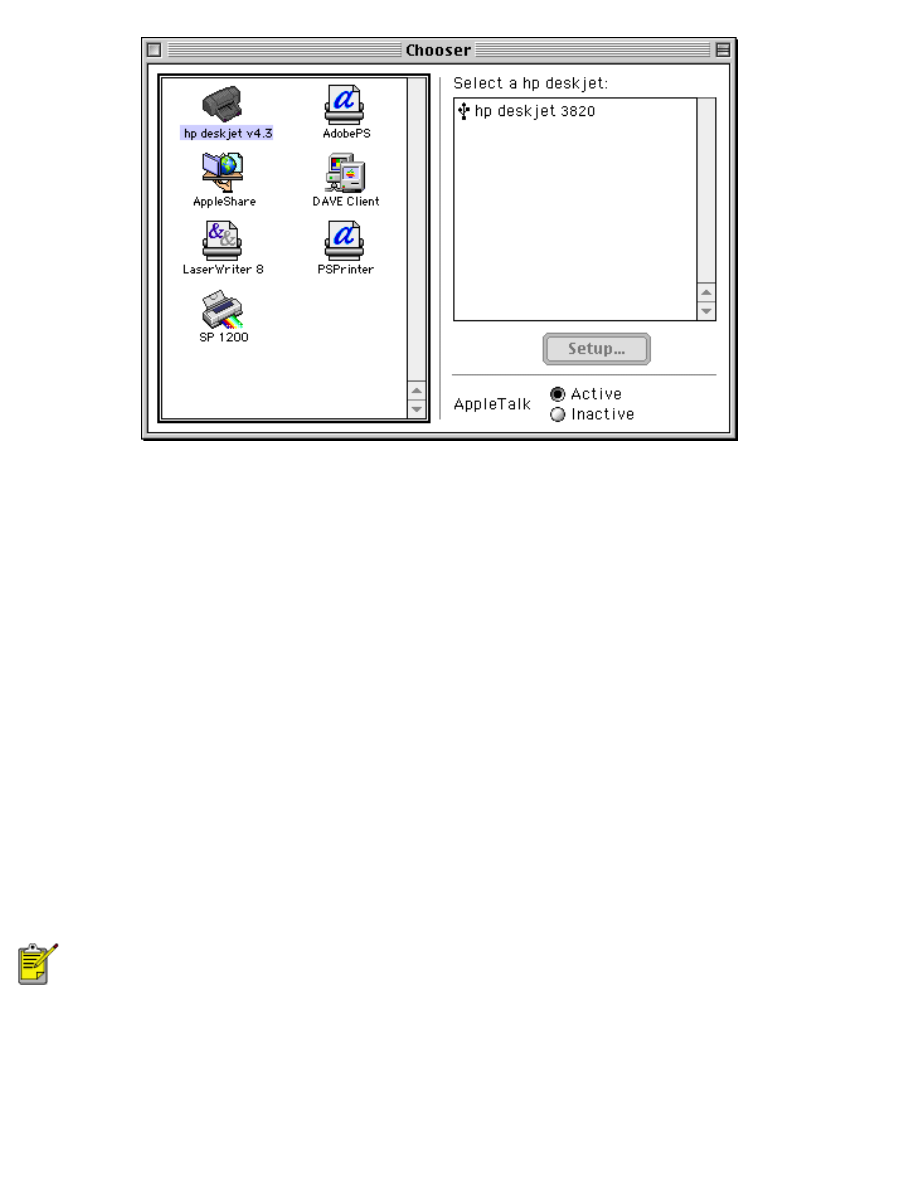
setting up the printer
Follow these steps to set up the printer:
1. Select
Chooser
from the Apple menu.
2. Click the hp printer icon in the left side of the Chooser dialog box.
file:///C|/Projects/Subway/Mac_UG/ug_printer_driver_legacy.html (1 of 11) [1/17/2002 3:22:36 PM]
using printer software with Mac OS 8.6, 9.x, and X Classic
3. Click
hp deskjet printer
in the right side of the Chooser dialog box.
4. Close the Chooser.
selecting a default printer
After setting up the printer with the Chooser, use one of the following methods to select it as the default printer:
●
Click the menu bar printer icon at the top of the screen, then select the printer name.
●
Click the control strip printer icon, then select the printer name.
●
Click the desktop printer icon, then choose
Set Default Printer
from the Printing menu.
printing from the computer's desktop
Desktop printing is useful when you want to print a number of documents at once or print a document that is
formatted for a particular printer.
Use one of the following methods to print from the desktop:
●
Drag the icons of the documents you want to print to the printer icon on the desktop.
●
Select the icons of the documents you want to print, then select
File
>
. Select the options you want
from the Print dialog box, then click the
OK
button.
Desktop printing is not supported in Mac OS X Classic.
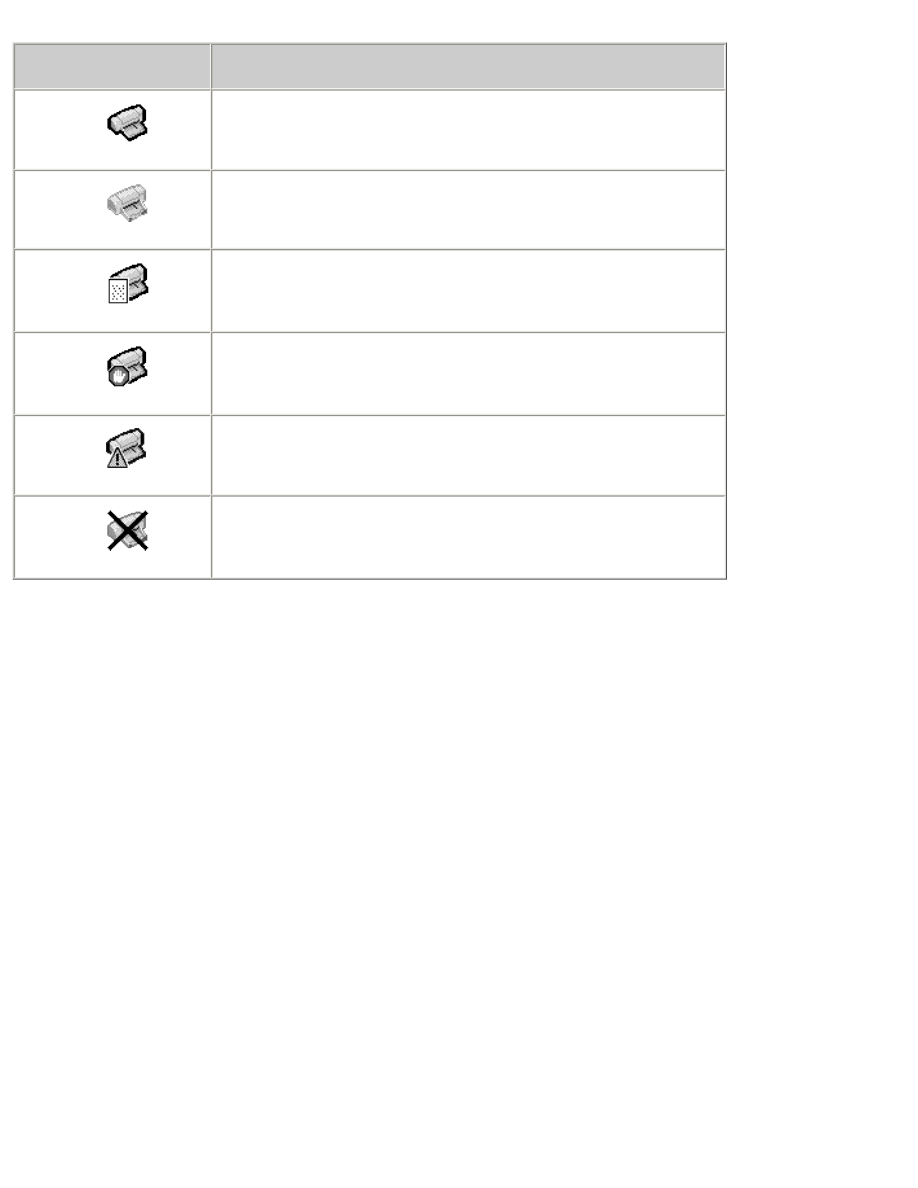
checking the printer status
The printer desktop icon shows you the status of the printer.
file:///C|/Projects/Subway/Mac_UG/ug_printer_driver_legacy.html (2 of 11) [1/17/2002 3:22:36 PM]
using printer software with Mac OS 8.6, 9.x, and X Classic
icon
meaning
Printer is idle and set as the default printer.
Printer is idle and not set as the default printer.
Printing on the default printer.
Printing stopped on the default printer.
Error on the default printer.
The printer driver is not available.
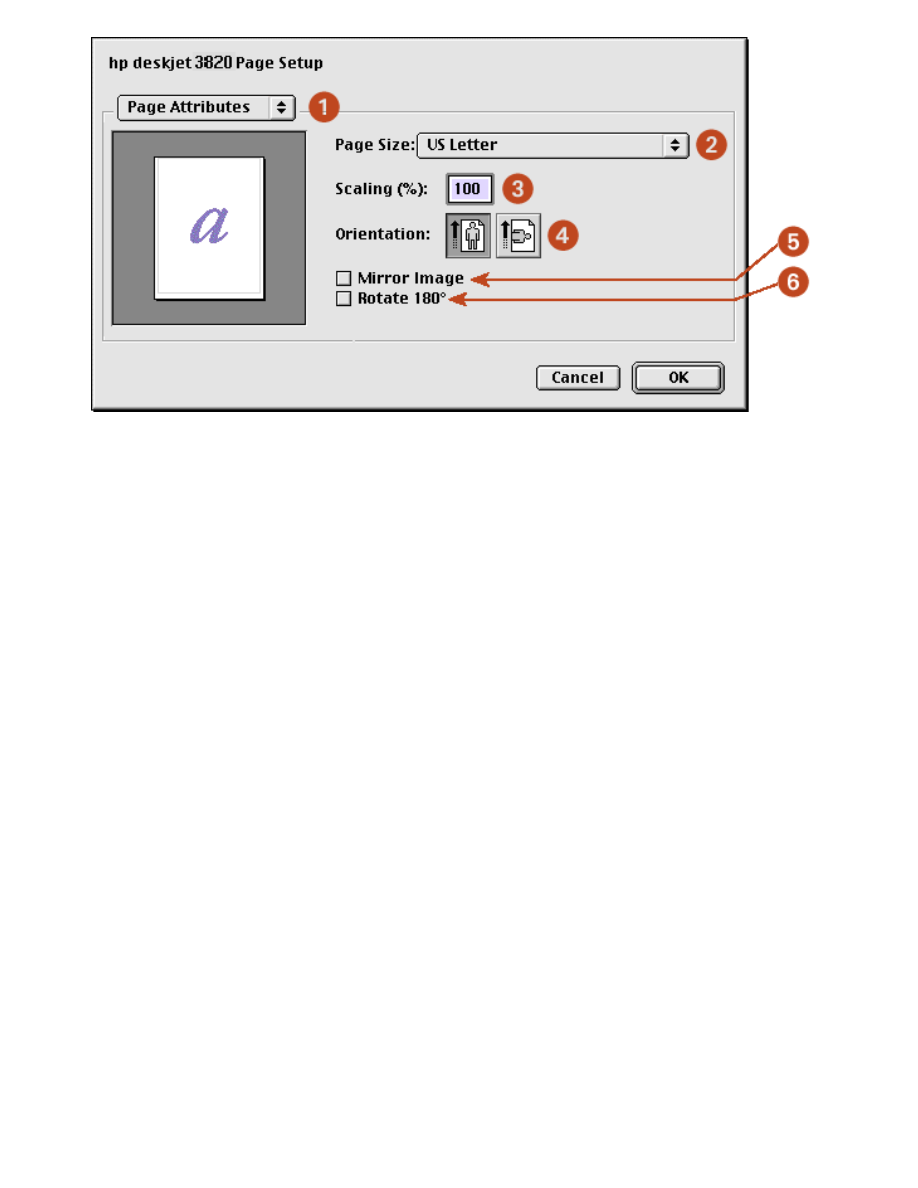
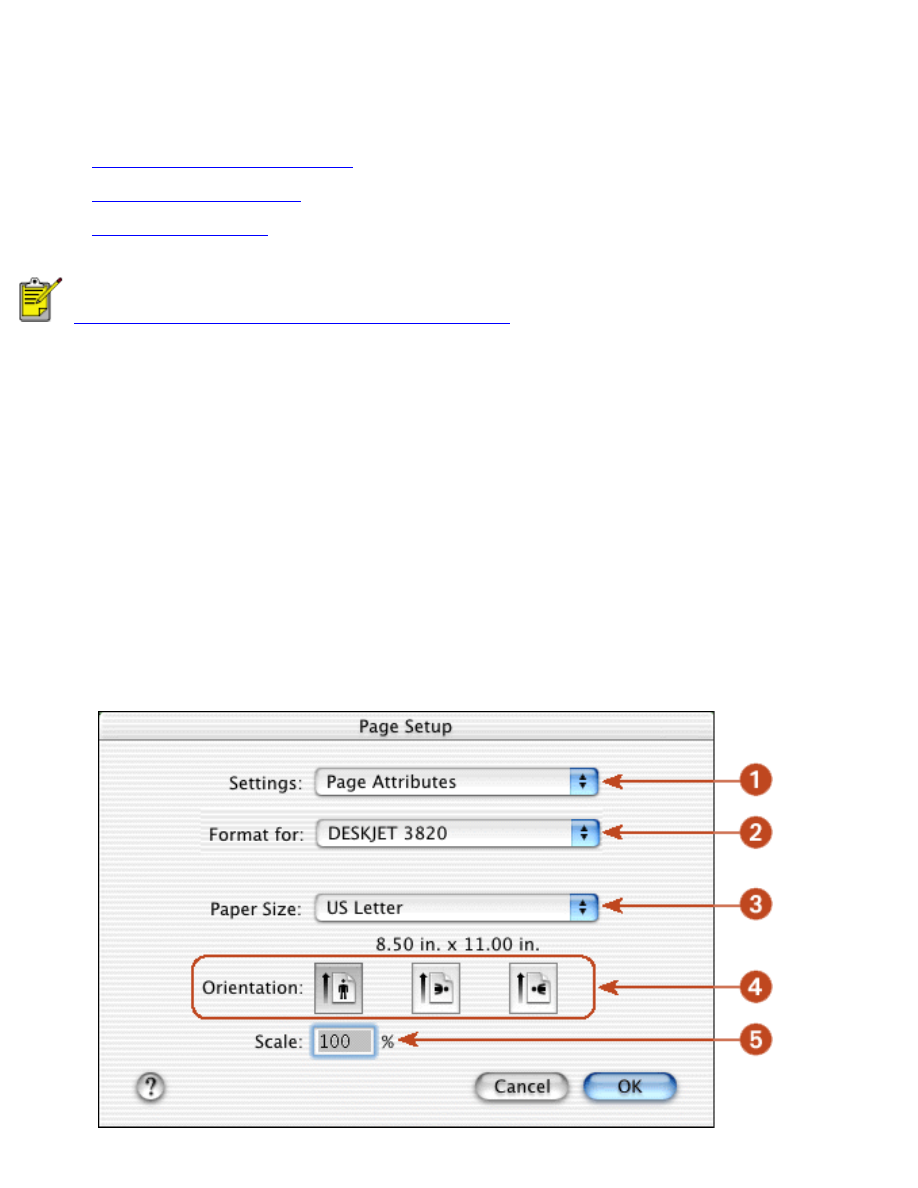
using the page setup dialog box
Use the Page Setup dialog box to modify a document's layout.
displaying the page setup dialog box
To display the Page Setup dialog box, open the software program used to create the document, then select
File
>
Page Setup
.
description
The following options are available on the Page Setup dialog box:
file:///C|/Projects/Subway/Mac_UG/ug_printer_driver_legacy.html (3 of 11) [1/17/2002 3:22:36 PM]
using printer software with Mac OS 8.6, 9.x, and X Classic
1.
Menu:
Choose one of the following:
❍
Page Attributes:
To set print options for the document.
❍
Application Attributes:
To set print options specific to the application being used.
2.
Page Size:
Select the paper size.
3.
Scaling (%):
Reduce or enlarge a document image:
❍
Enter a number from 25-99 to reduce a document image.
❍
Enter a number from 101 to 400 to enlarge a document image.
4.
Orientation:
Click the appropriate icon for the page orientation.
5.
Mirror Image:
Click to print a mirror image.
6.
Rotate 180º:
Click to rotate the page image 180 degrees top to bottom (turns the original upside down).
using the print dialog box
Use the Print dialog box to modify print settings for the document you are printing. The options displayed depend on
the panel selected.
displaying the print dialog box
To display the Print dialog box, open the document you want to print, then select
File
>
.
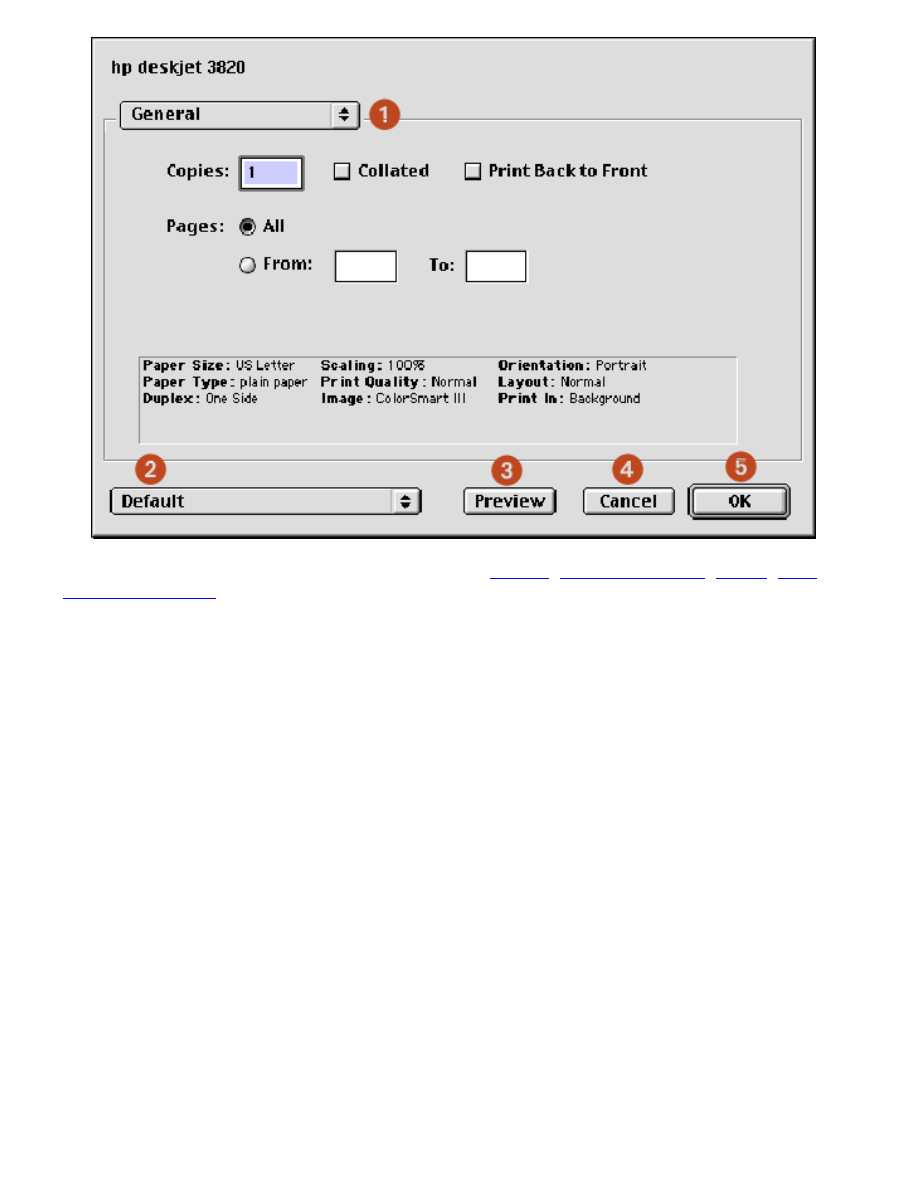
menu and buttons
Use the menu and buttons for these functions:
file:///C|/Projects/Subway/Mac_UG/ug_printer_driver_legacy.html (4 of 11) [1/17/2002 3:22:36 PM]
using printer software with Mac OS 8.6, 9.x, and X Classic
1.
Panel Menu:
Click the menu to select different panels:
General
,
Paper Type/Quality
,
Layout
,
Color
,
Background Printing
, or an application-specific panel.
2.
Settings Menu:
Click to select one of the following:
❍
Select a pre-defined or
Default
set of print settings.
❍
Create or edit a set of print settings.
3.
Preview:
Click to see a preview of the printed document.
4.
Cancel:
Click to close the Print dialog box without printing.
5.
OK:
Click to print the document.
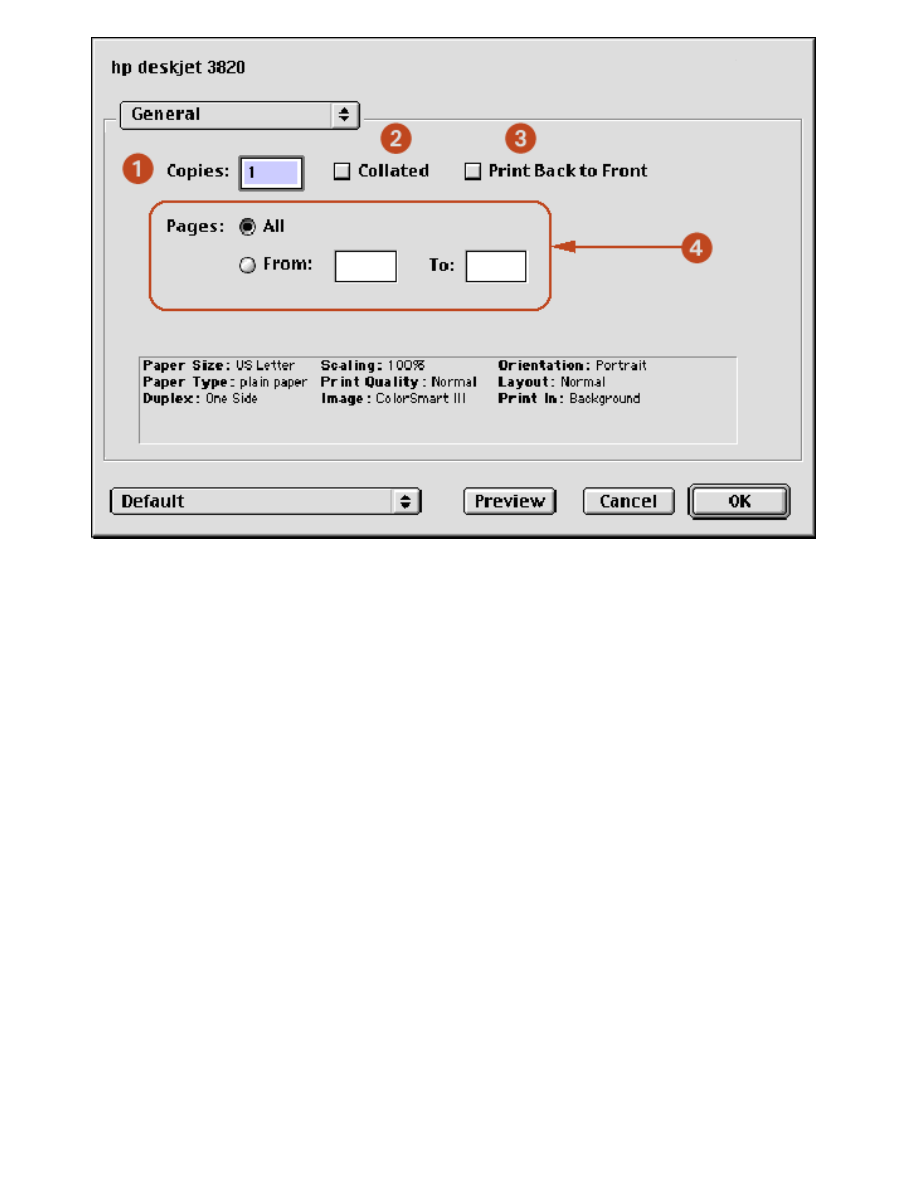
general
Use the General panel for these functions:
file:///C|/Projects/Subway/Mac_UG/ug_printer_driver_legacy.html (5 of 11) [1/17/2002 3:22:36 PM]
using printer software with Mac OS 8.6, 9.x, and X Classic
1.
Copies:
Enter the number of copies to be printed.
2.
Collate:
Select to collate if printing multiple copies.
3.
Print Back to Front:
Select to print the last sheet first.
4.
Pages:
Choose one of the following:
❍
Click
All
to print the entire document.
❍
To print a range of pages, click
From
, then enter the first page to print in the
From:
box and the last
page to print in the
To:
box.
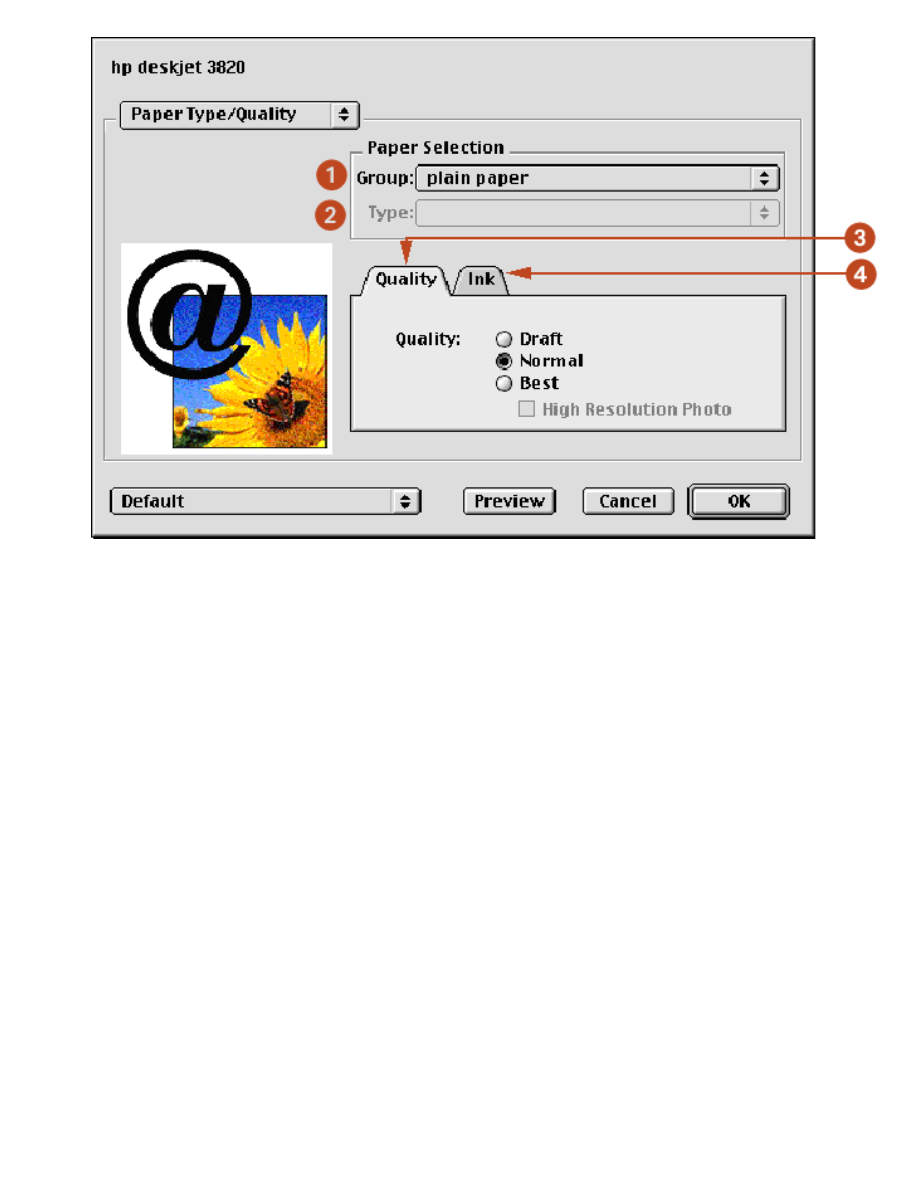
paper type/quality
Use the Paper Type/Quality panel for these functions:
file:///C|/Projects/Subway/Mac_UG/ug_printer_driver_legacy.html (6 of 11) [1/17/2002 3:22:36 PM]
using printer software with Mac OS 8.6, 9.x, and X Classic
1.
Paper Group:
Select the category of paper used, such as plain paper.
2.
Paper Type:
Select the specific type of paper used. The available options vary according to the Paper Group
selected.
3.
Quality:
Select one of the following print speed and quality options:
Draft
,
Normal
,
Best
, and
High
Resolution Photo
.
Best
provides the best print quality at the slowest printing speed. The print speed
increases and the print quality lessens with
Normal.
Draft
provides draft quality at the fastest printing speed.
High Resolution photo
provides 4800 x 1200 optimized dpi printing (available with certain photo paper types
when Best mode is selected).
4.
Ink:
Click to set the ink density.
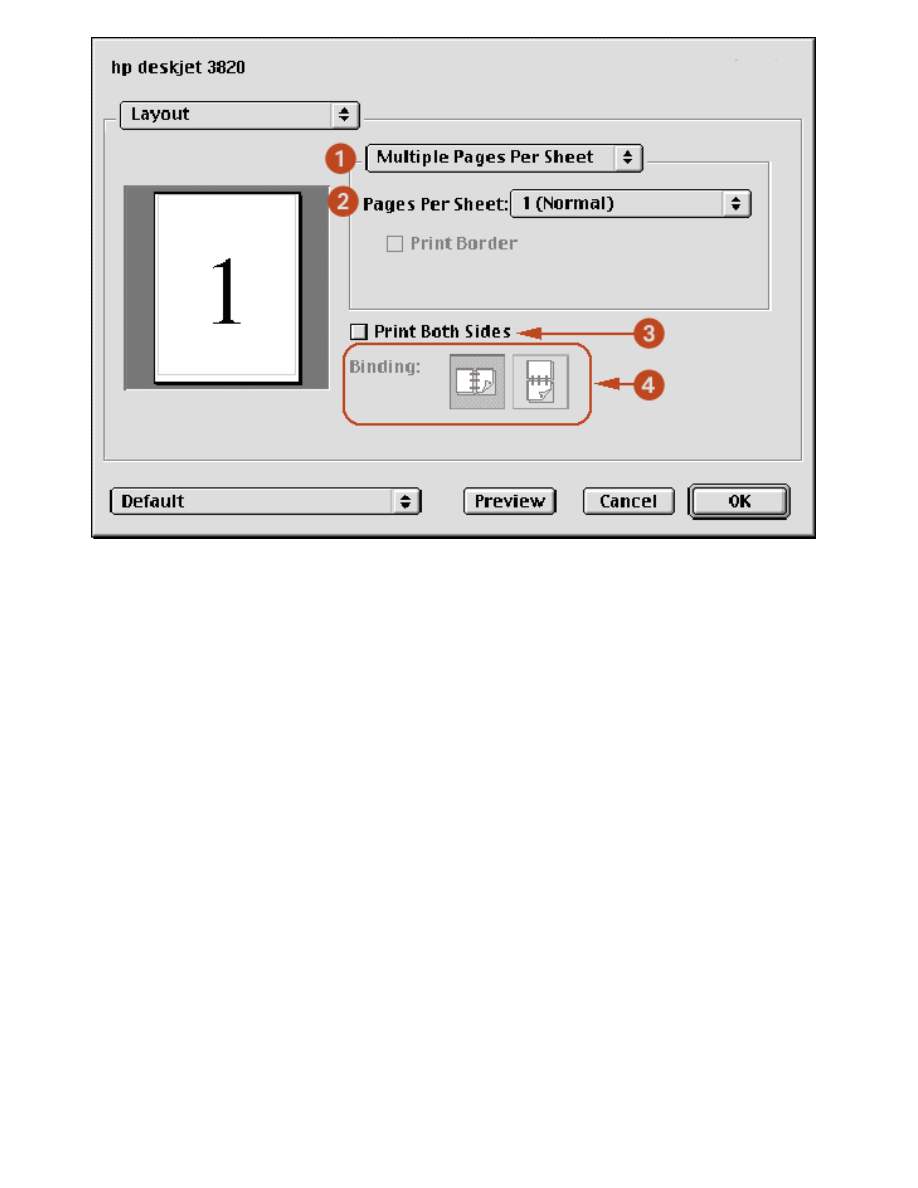
layout
Select the
Layout
panel for page layout options:
file:///C|/Projects/Subway/Mac_UG/ug_printer_driver_legacy.html (7 of 11) [1/17/2002 3:22:36 PM]
using printer software with Mac OS 8.6, 9.x, and X Classic
1.
Layout Menu:
Choose one of the following combinations:
❍
Multiple Pages Per Sheet/Pages Per Sheet:
Select these options for most printing jobs. You can
choose the number of pages to appear on each sheet of paper:
1 (Normal)
,
2
,
4
,
6
,
9
, or
12 up
.
❍
Booklet:
Select
Booklet
to print a booklet, then select the size of paper to use. You can print the
booklet from left to right or right to left.
❍
ZoomSmart/Print On:
Select
ZoomSmart
to scale from one paper size to another. For example,
to shrink a legal-size document to print on letter/A4 paper.
❍
Tiling:
Select to print one image on several sheets of paper. Use the the Tiling Size option to select
how many pages to print the image on.
2.
Print Border:
If more than one page is being printed on a sheet of paper, select
Print Border
to print a
border around each page on the sheet.
3.
Print Both Sides:
Select for two-sided printing.
4.
Binding:
Click the icon for Book (binding at the side), or Tablet (binding at the top) when using two-sided
printing.
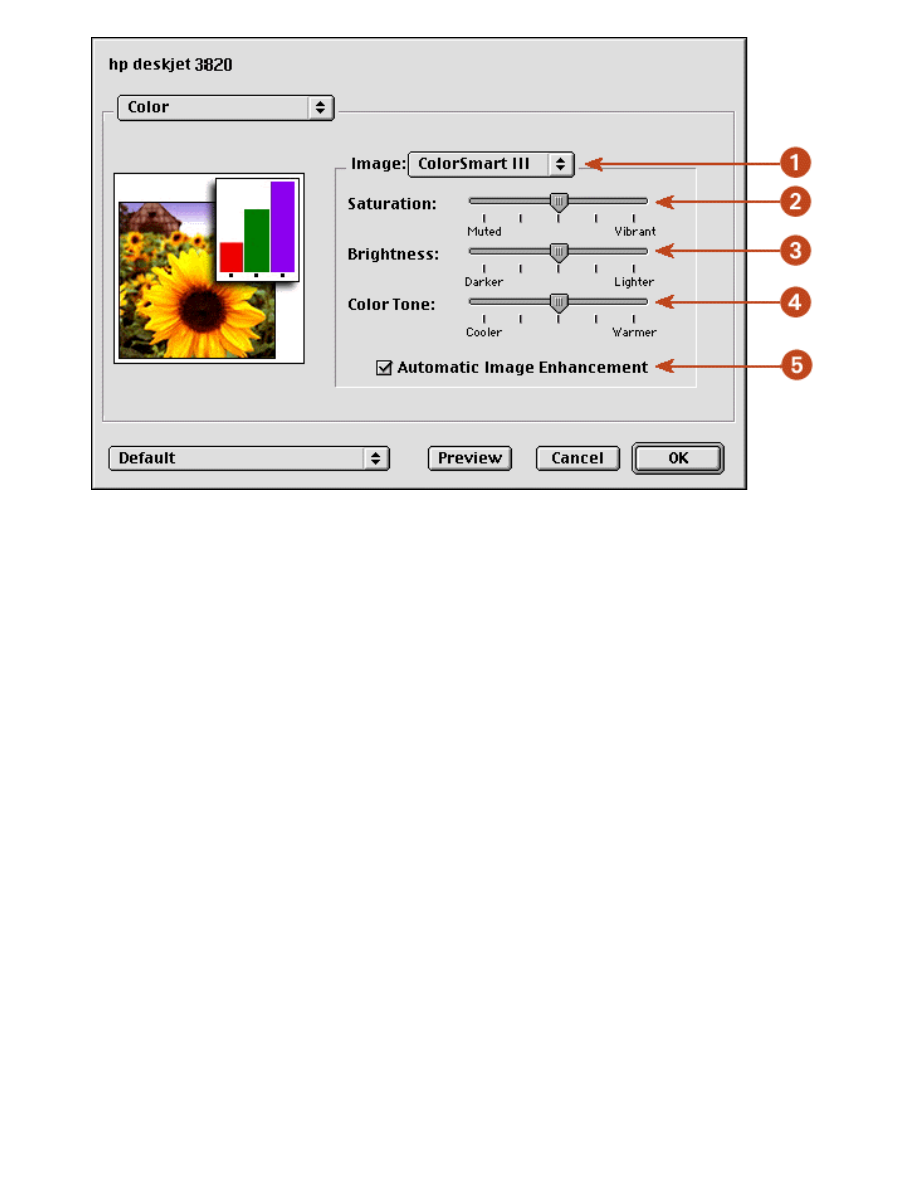
color
Use the Color panel for these functions:
file:///C|/Projects/Subway/Mac_UG/ug_printer_driver_legacy.html (8 of 11) [1/17/2002 3:22:36 PM]
using printer software with Mac OS 8.6, 9.x, and X Classic
1.
Image:
Choose one of the following:
❍
ColorSmart III:
Prints optimum color quality.
❍
ColorSync:
Prints using the ColorSync matching system.
❍
Grayscale:
Prints in shades of gray.
❍
Black & White:
Prints in black and white without shades of gray.
2.
Saturation:
Slide to adjust the color saturation.
3.
Brightness:
Slide to make the image lighter or darker.
4.
Color Tone:
Slide to adjust coolness and warmth.
5.
Automatic Image Enhancement:
Check this box to activate Automatic Contrast Enhancement and Fixed
Resolution Enhancement.
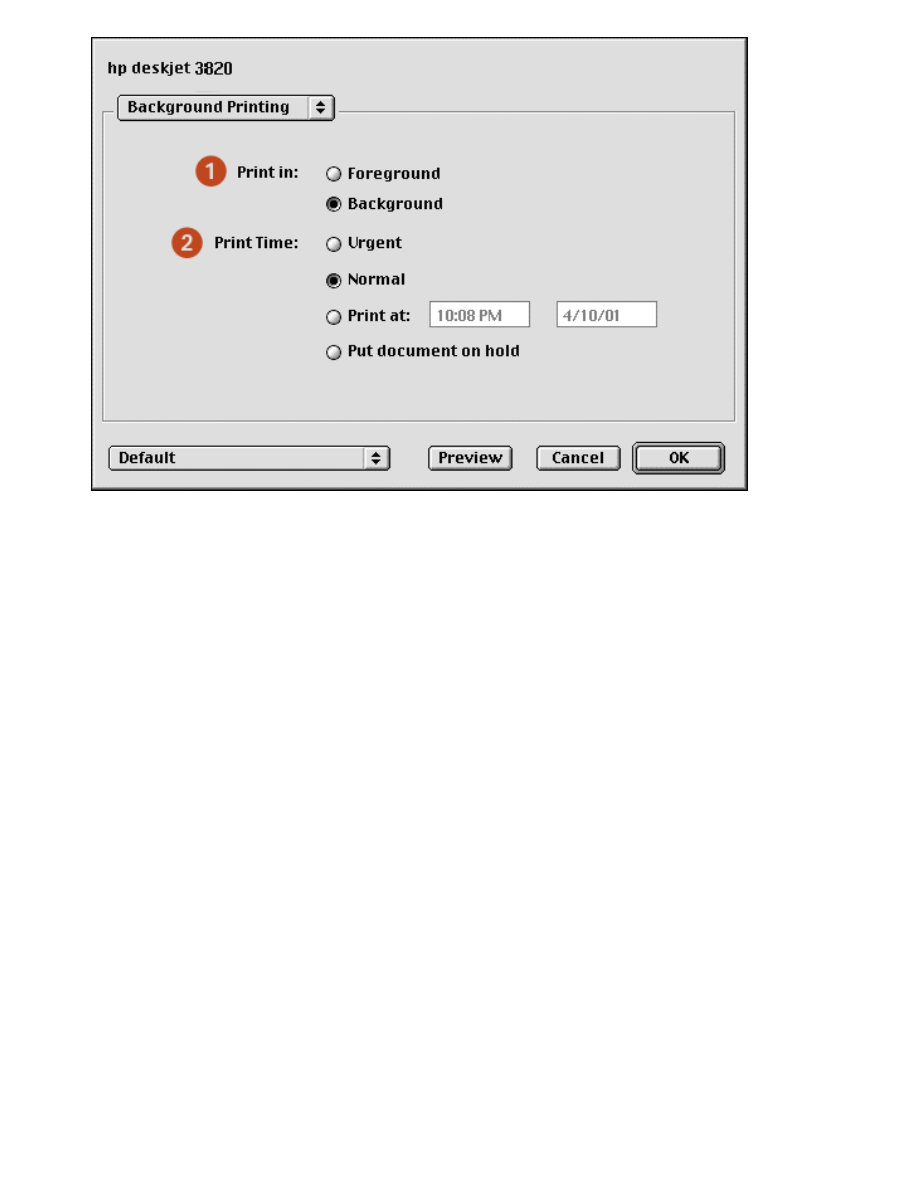
background printing
Use the Background Printing panel for these functions:
file:///C|/Projects/Subway/Mac_UG/ug_printer_driver_legacy.html (9 of 11) [1/17/2002 3:22:36 PM]
using printer software with Mac OS 8.6, 9.x, and X Classic
1.
Print In:
Choose one of the following:
❍
Foreground:
Faster printing.
❍
Background:
Allows you to use the computer while the document prints.
2.
Print Time:
Choose one of the following:
❍
Urgent:
Begin printing as soon as possible.
❍
Normal:
Print job will be sent to queue and printed in order.
❍
Print at:
Specify a date and time to print the document.
❍
Put document on hold:
Hold the document in the desktop printer to print at a later time.
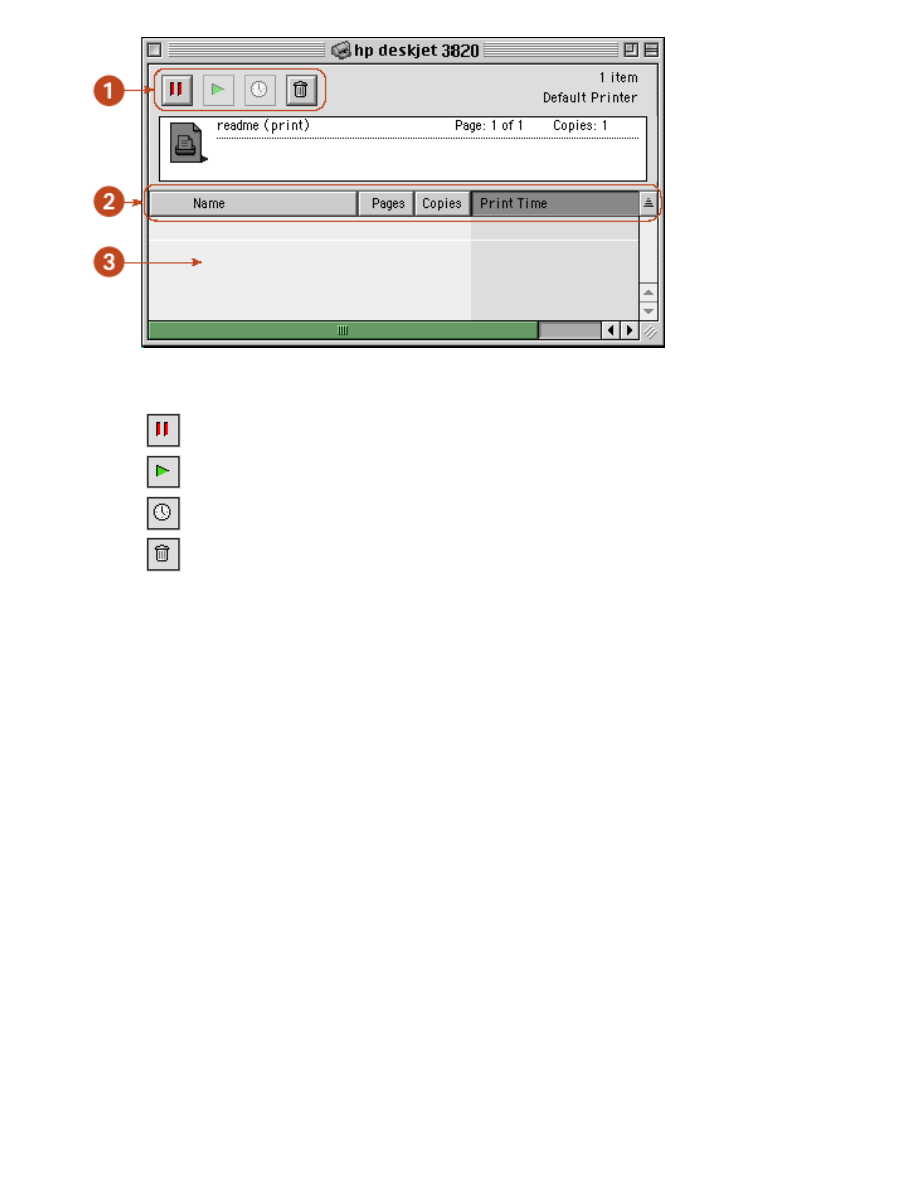
viewing and changing the status of a print job
When printing a document with background printing, use the Print Status dialog box to see the status of the
document as it is printing.
displaying the print status dialog box
Double-click the
hp printer
icon on the desktop to display the Print Status dialog box.
using the print status dialog box
The following options are available on the Print Status dialog box:
file:///C|/Projects/Subway/Mac_UG/ug_printer_driver_legacy.html (10 of 11) [1/17/2002 3:22:36 PM]
using printer software with Mac OS 8.6, 9.x, and X Classic
1.
Control Buttons:
Select a print job in the print queue, then click one of the following buttons to control
printing:
Pause a print job.
Restart printing.
Set the print time.
Delete a print job.
2.
Column Titles:
Click a column title to sort print jobs.
3.
Print Queue:
Select a print job, then drag it to a new position in the print queue.
file:///C|/Projects/Subway/Mac_UG/ug_printer_driver_legacy.html (11 of 11) [1/17/2002 3:22:36 PM]
using printer software with Mac OS X