using printer software with Mac OS X
The printer is controlled by software installed on the computer. For instructions on using the printer
software, select one of the following topics:
●
using the page setup dialog box
●
using the print dialog box
●
using the print center
Mac OS X Classic is a Mac OS X feature that allows applications built for Mac OS 9.x to run on a Mac OS
X computer. Mac OS X Classic applications have a Mac OS 9.x interface. For more information, see
using printer software with Mac OS 8.6, 9.x, and X Classic
.
using the page setup dialog box
Use the Page Setup dialog box to modify a document's layout.
displaying the page setup screen
To display the Page Setup screen, open the software program used to create the document, then select
File
>
Page Setup
.
description
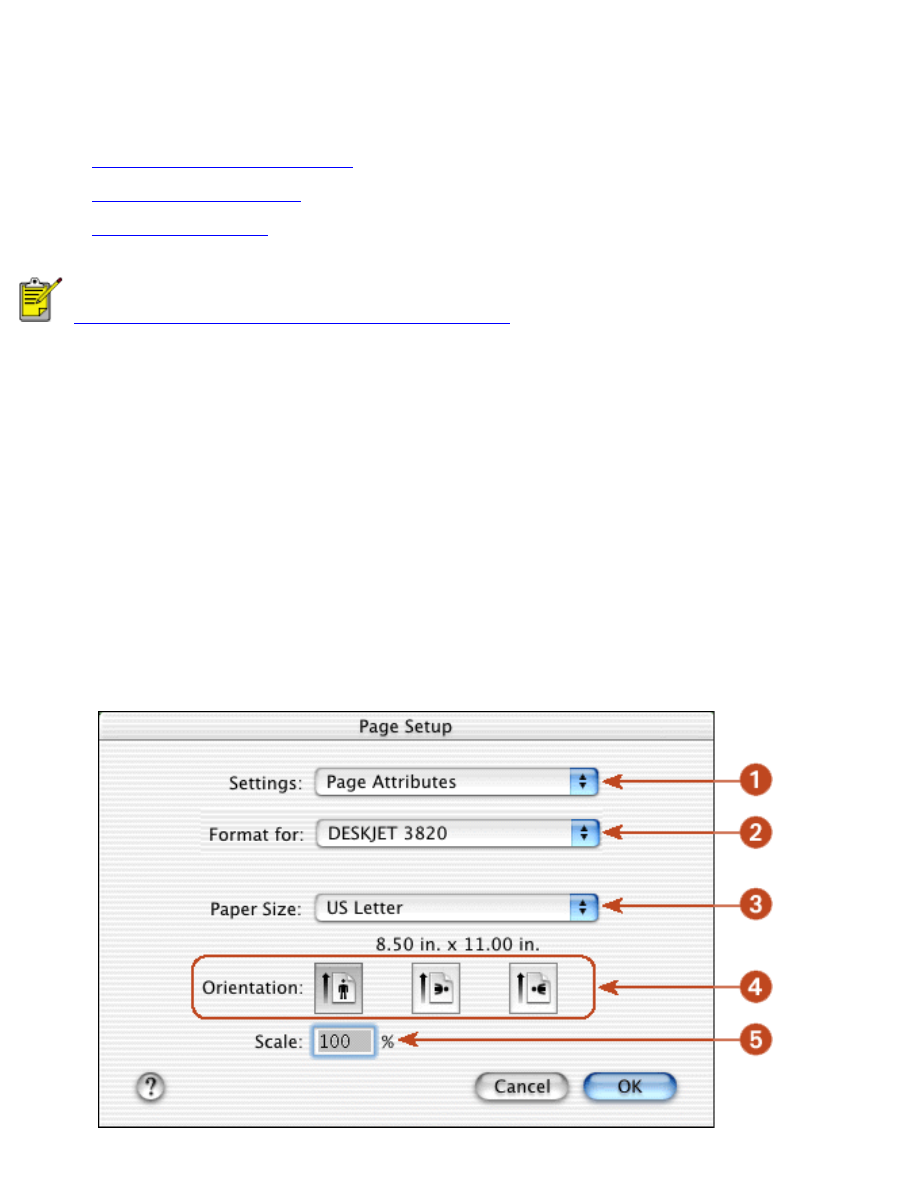
The following options are available on the Page Setup dialog box.
file:///C|/Projects/Subway/Mac_UG/ug_printer_driver_osx.html (1 of 10) [1/17/2002 3:22:37 PM]

using printer software with Mac OS X
1.
Settings
: Choose one of the following:
❍
Page Attributes
: To set print options for the document.
❍
Application Attributes
: To set print options specific to the application being used.
❍
Summary:
To view the print settings for the document.
2.
Format for
: Select the printer name.
3.
Paper Size
: Select the paper size.
4.
Orientation
: Click the appropriate icon for the page orientation.
5.
Scale
: Reduce or enlarge a document image:
❍
Enter a number from 25-99 to reduce a document image.
❍
Enter a number from 101 to 500 to enlarge a document image.
using the print dialog box
Use the Print dialog box to modify print settings for the document you are printing. The options displayed
depend on the panel selected.
displaying the print dialog box
To display the Print dialog box, open the document you want to print, then select
File
>
.
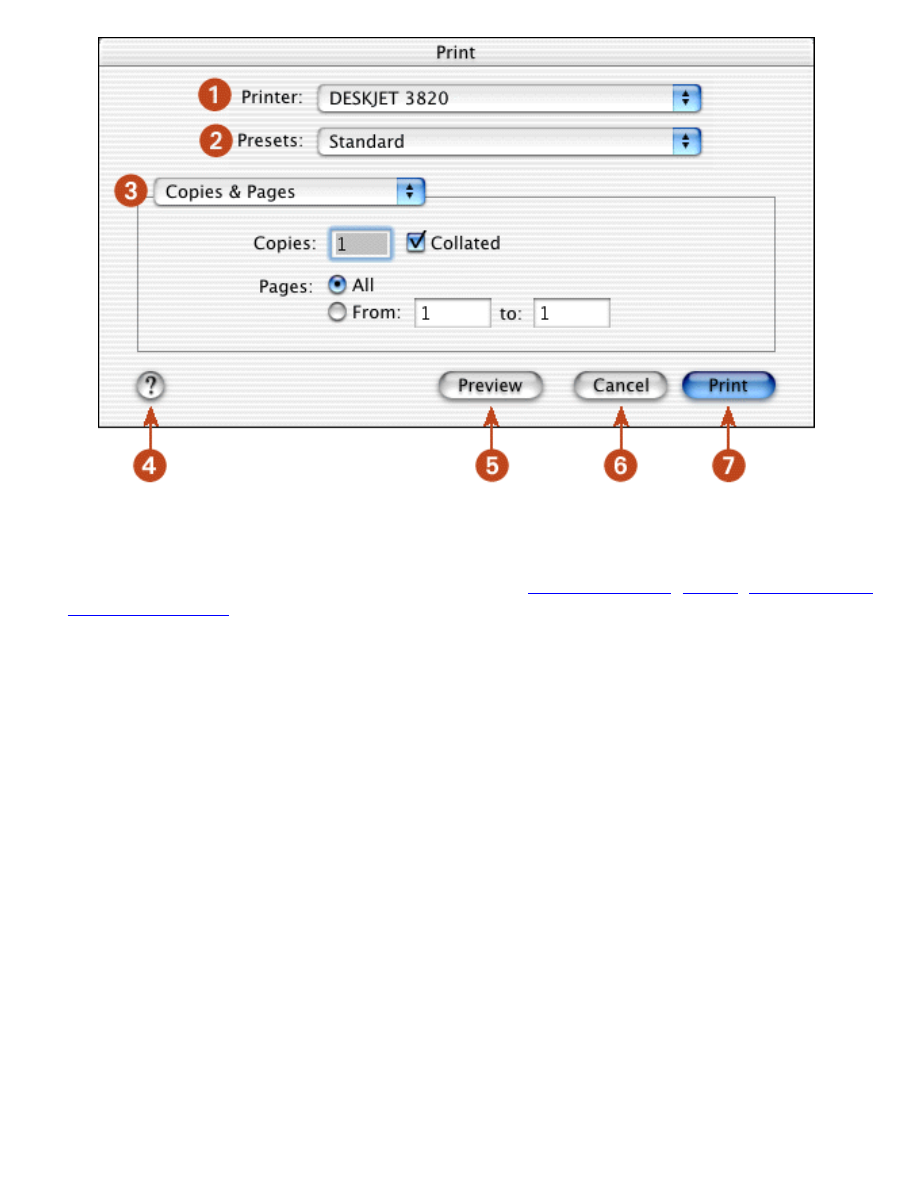
menu and buttons
Use the menu and buttons for these functions:
file:///C|/Projects/Subway/Mac_UG/ug_printer_driver_osx.html (2 of 10) [1/17/2002 3:22:37 PM]
using printer software with Mac OS X
1.
Printer
: If necessary, select the printer.
2.
Presets
: Select a group of saved print options.
3.
Panel Menu
: Click the menu to select different panels:
Copies and Pages
,
Layout
,
Output Options
,
Paper Type/ Quality
, an application-specific panel, or a summary of print settings for the document.
4.
?
:
Click to view Mac Help
.
5.
Preview
: Click to see a preview of the printed document.
6.
Cancel
: Click to close the Print dialog box without printing.
7.
: Click to print the document.
copies and pages
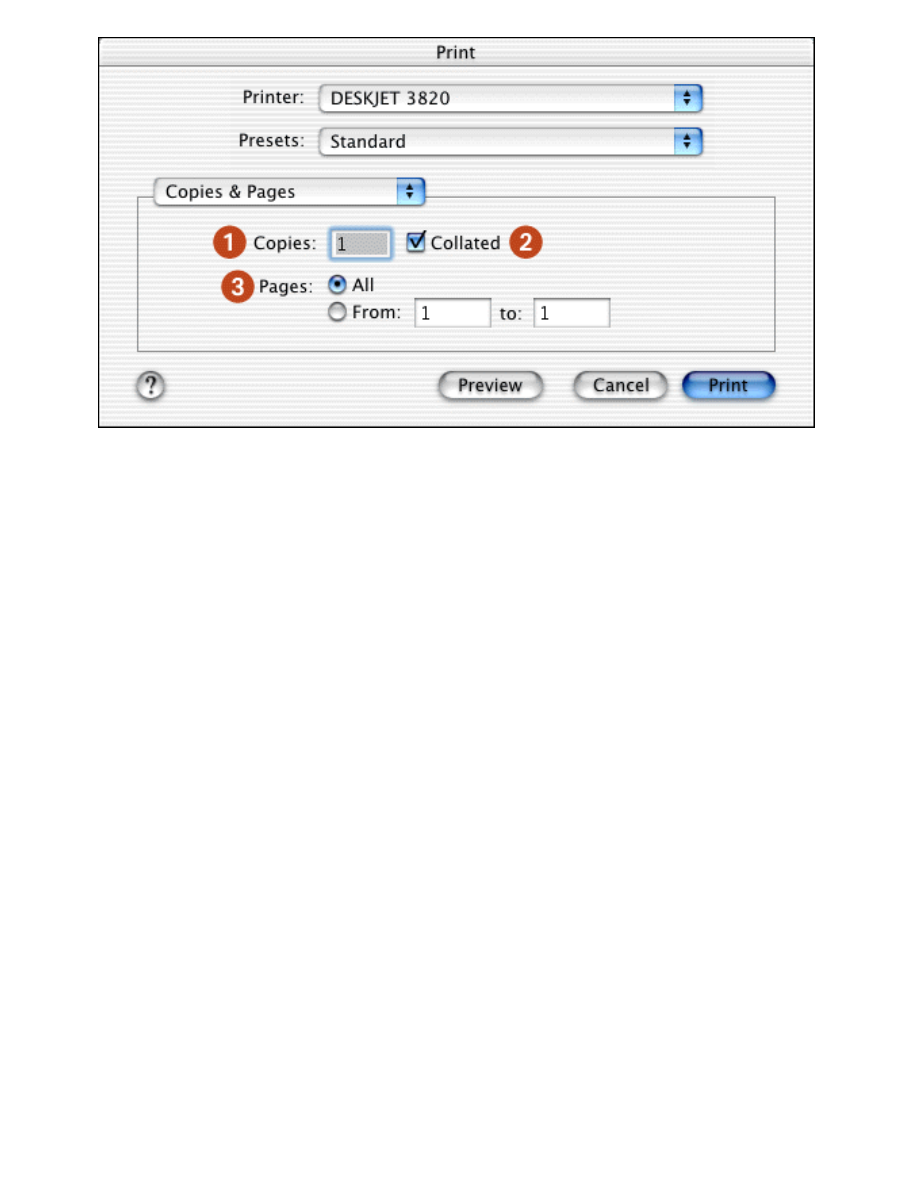
Use the Copies and Pages panel for these functions:
file:///C|/Projects/Subway/Mac_UG/ug_printer_driver_osx.html (3 of 10) [1/17/2002 3:22:37 PM]
using printer software with Mac OS X
1.
Copies
: Enter the number of copies to be printed.
2.
Collated
: Select to collate if printing multiple copies.
3.
Pages
: Choose one of the following:
❍
Click
All
to print the entire document.
❍
To print a range of pages, click
From
then enter the first page to print in the
From:
box and
the last page to print in the
To:
box.
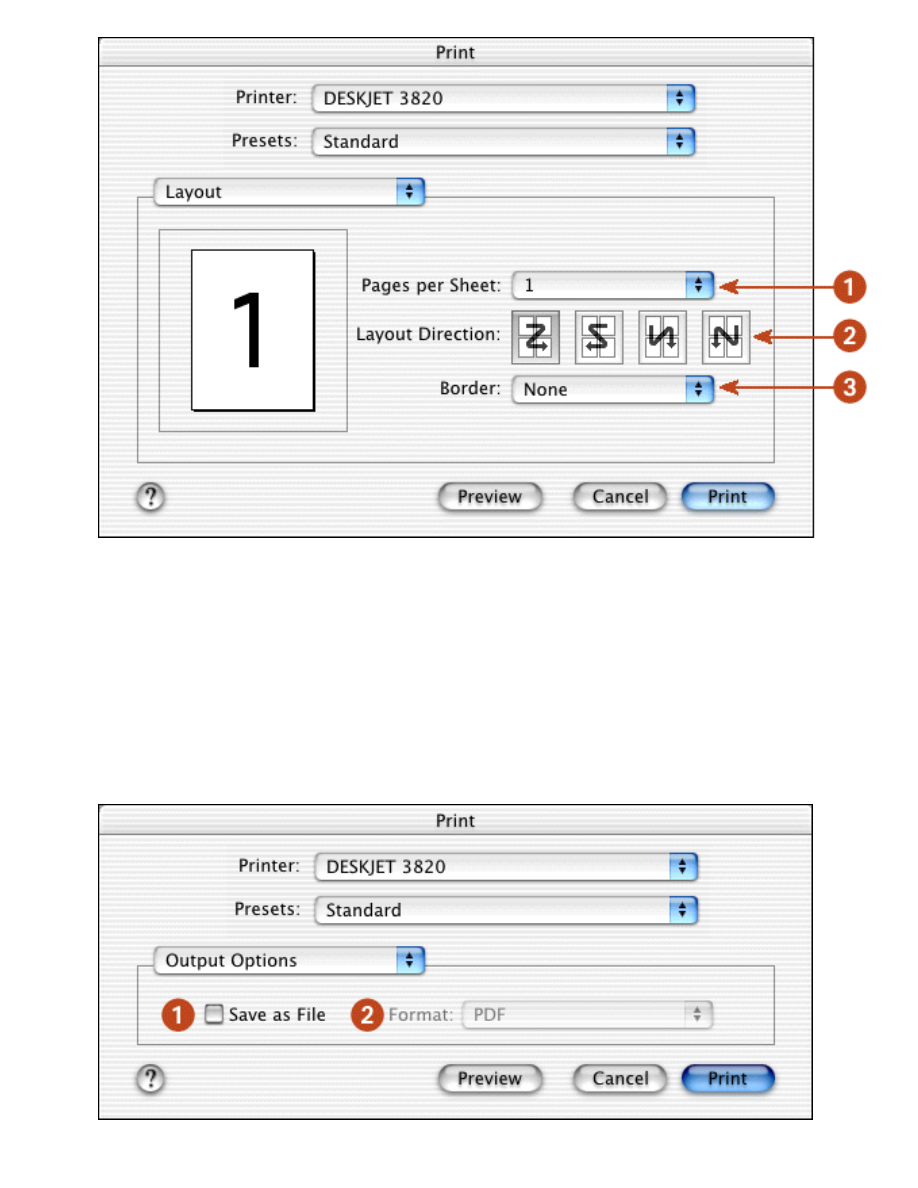
layout
Use the Layout panel for these functions:
file:///C|/Projects/Subway/Mac_UG/ug_printer_driver_osx.html (4 of 10) [1/17/2002 3:22:37 PM]
using printer software with Mac OS X
1.
Pages per Sheet
: Select how many pages to print on each sheet of paper.
2.
Layout Direction
: Select the option for how multiple pages are arranged on a sheet of paper.
3.
Border
: Select the border to appear around each page.
output options
Use the Output Options panel for these functions:
file:///C|/Projects/Subway/Mac_UG/ug_printer_driver_osx.html (5 of 10) [1/17/2002 3:22:37 PM]
using printer software with Mac OS X
1.
Save as File
: Select to print to file.
2.
Format
: Select either
or
PS (PostScript)
.
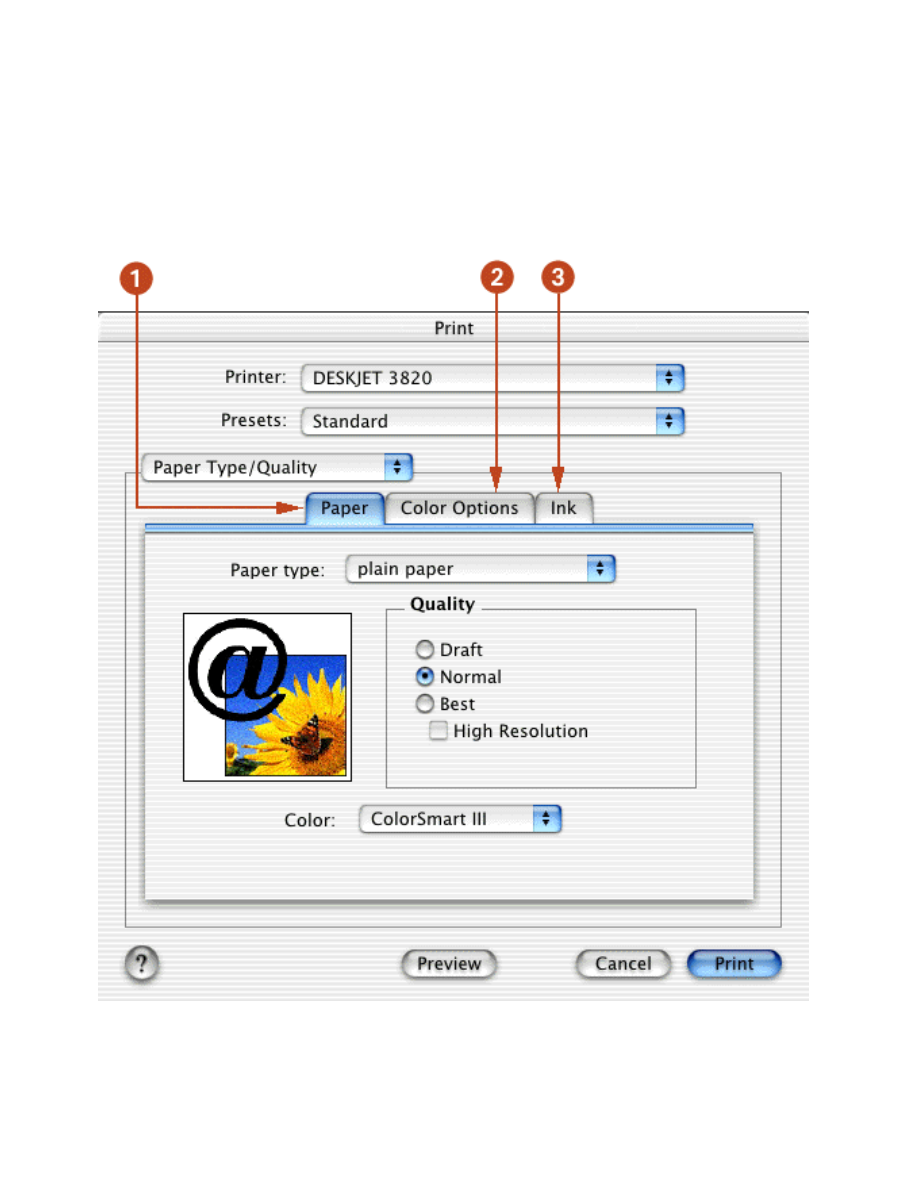
paper type/quality
Use the Paper Type/Quality panel for these functions:
1.
Paper
: Click to select the following options:
❍
Paper Type:
Select the paper type desired.
❍
Quality:
Select one of the following print speed and quality options:
Best
,
Normal
,
Draft
,
and
High Resolution Photo
.
Best
provides the best print quality at the slowest printing
file:///C|/Projects/Subway/Mac_UG/ug_printer_driver_osx.html (6 of 10) [1/17/2002 3:22:37 PM]

using printer software with Mac OS X
speed. The print speed increases and the print quality lessens with
Normal.
Draft
provides
draft quality at the fastest printing speed.
High Resolution photo
provides 4800 x 1200
optimized dpi printing (available with certain photo paper types when
Best
mode is
selected).
❍
Color:
Select the color setting.
2.
Color Options
: Click to set saturation, brightness, and color tone.
3.
Ink:
Click to set ink density.
using the print center
Use the Print Center to:
●
Manage available printers
●
Select a default printer
●
Add a printer
●
Manage print jobs
displaying the print center
Follow these steps to display the Print Center:
1. Click
Applications
in the Finder window.
2. Select the
Utilities
folder.
3. Select the
Print Center
icon.
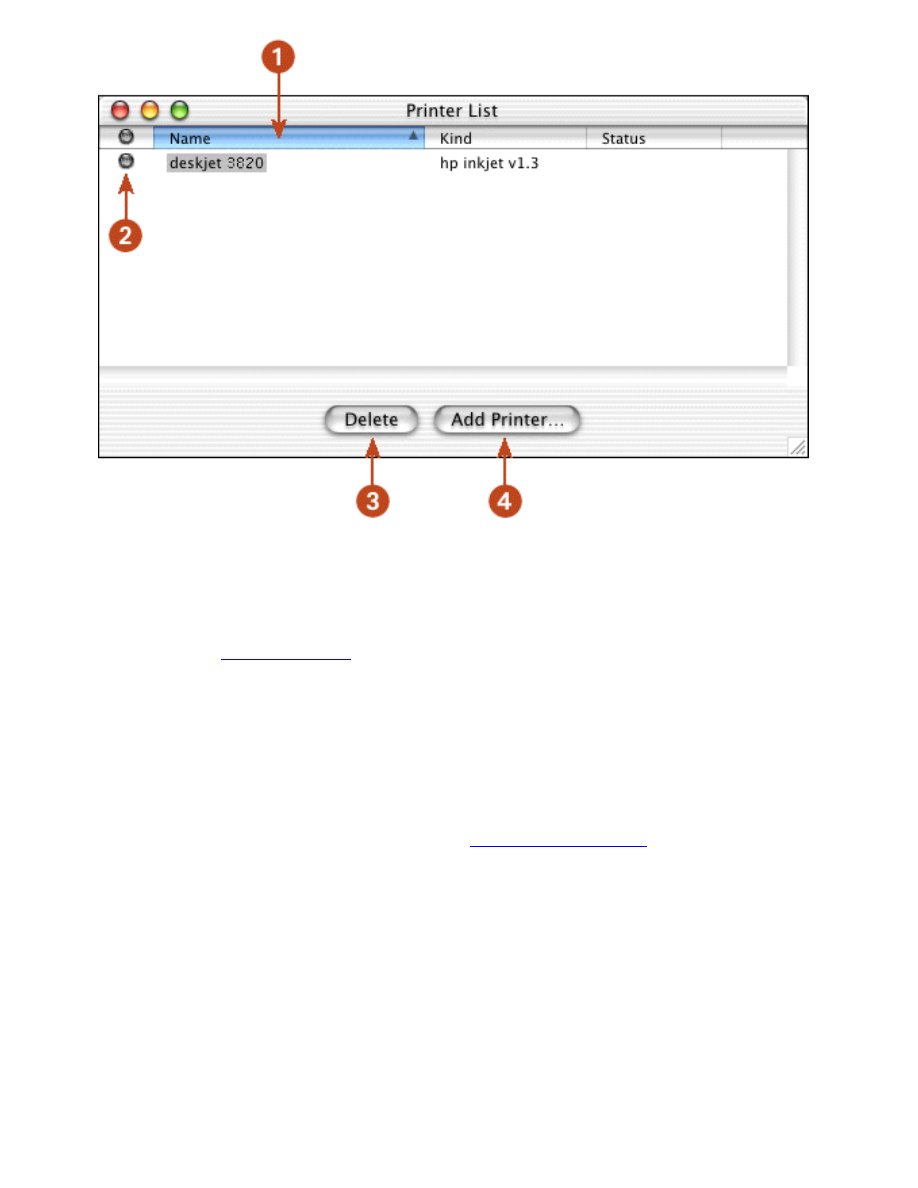
managing available printers
Use the Print Center to manage available printers:
file:///C|/Projects/Subway/Mac_UG/ug_printer_driver_osx.html (7 of 10) [1/17/2002 3:22:37 PM]
using printer software with Mac OS X
1.
Name Column
: Click a printer name to select the printer.
2.
Blue Bullet
: Indicates default printer.
3.
Delete
: Select a printer, then click
Delete
to remove the printer from the computer.
4.
Add Printer
: See
adding a printer
.
selecting a default printer
Follow these steps to set the printer as the computer's default printer:
1. Open the Print Center.
For instructions on opening the Print Center, see
using the print center
.
2. Click the printer name.
3. Do one of the following:
❍
Select
Printers
>
Make Default
❍
Press
Command
+
d
A blue bullet appears next to the printer name to indicate that it is the default printer.
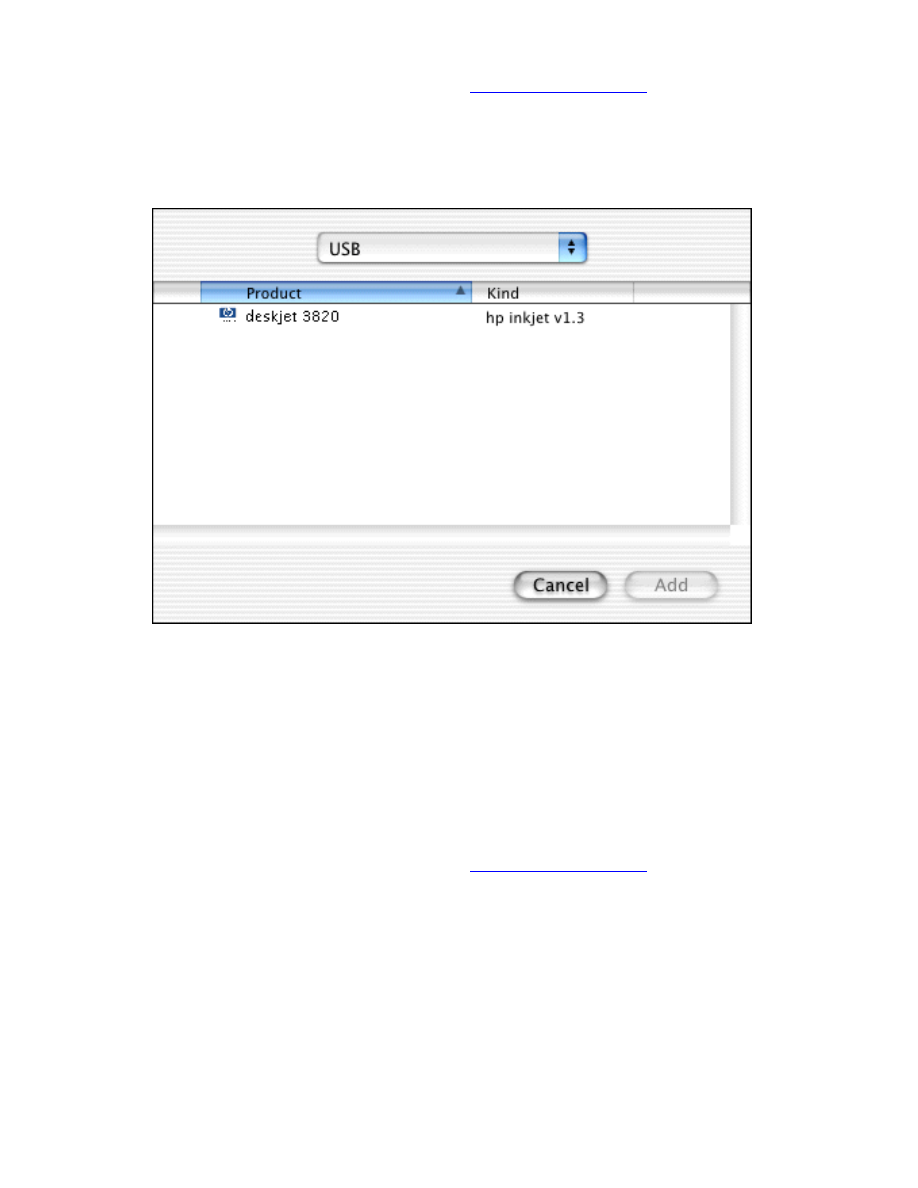
adding a printer
Follow these steps to add a printer to your computer:
file:///C|/Projects/Subway/Mac_UG/ug_printer_driver_osx.html (8 of 10) [1/17/2002 3:22:37 PM]
using printer software with Mac OS X
1. Open the Print Center.
For instructions on opening the Print Center, see
using the print center
.
2. Click the
Add Printer
button.
The Add Printer List dialog box appears.
3. Select the printer name from the printer list.
4. Click the
Add
button.
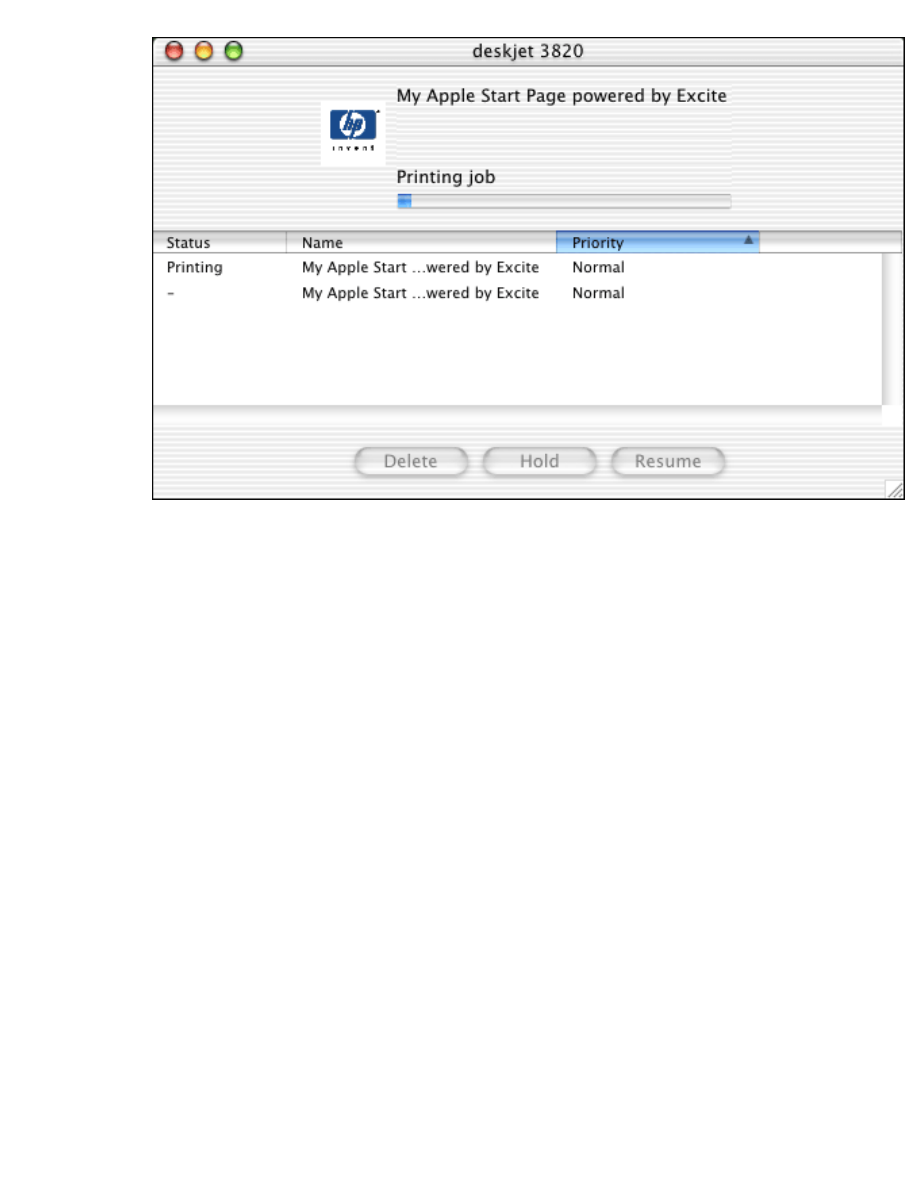
managing print jobs
Use the Print Center to manage print jobs.
1. Open the Print Center.
For instructions on opening the Print Center, see
using the print center
.
2. Select the printer.
The print queue appears.
file:///C|/Projects/Subway/Mac_UG/ug_printer_driver_osx.html (9 of 10) [1/17/2002 3:22:37 PM]
using printer software with Mac OS X
3. Click a print job to select it.
4. Use the buttons to manage the print job as desired:
❍
Delete
: Cancels the selected print job.
❍
Hold
: Pauses the selected print job.
❍
Resume
: Restarts a paused print job.
file:///C|/Projects/Subway/Mac_UG/ug_printer_driver_osx.html (10 of 10) [1/17/2002 3:22:37 PM]